“OneCommunity” Documentation by “Diabolique Design”
OneCommunity - BuddyPress Theme
Last update: 26 Jan 2024
By: Diabolique Design
Thank you for purchasing OneCommunity theme. If you have any questions that are beyond the scope of this help file, please visit the Support Forum. Thanks so much!
P.S. Before you ask any question please read FAQ section on the item page:

Please visit the online theme documentation. It's usually more up to date than the offline documentation.
Table of Contents
- I. Theme & BuddyPress installation
- II. How to install Ajax Search Pro plugin?
- III. How to install WP ULike plugin? (IMPORTANT)
- IV. How to install GamiPress plugin?
- V. How to install forums?
- VI. Contact form installation
- VII. How to display menu on the header?
- VIII. Frontpage customization using Elementor
- IX. How to translate theme?
- X. How to add subtitle and thumbnail caption to a blog post?
- XI. Profile Fields
- XII. How to install Events?
- XIII. How to configure a Paid Membership Pro plugin?
- XIV. How to install WooCommerce plugin?
- XV. How to customize theme?
- XVI. All shortcodes list
- XVII. Youzify
- XVIII. How to install LearnPress?
- XIX. How to increase speed of your website?
- XX. How to assign selected blog posts to the BuddyPress group?
I. Theme & BuddyPress installation - top
1. Go to WP Dashboard → Appearance → Themes → Add New and upload onecommunity-theme.zip file with a theme and activate it.2. Go to Tools → Import and install WordPress importer. Now run importer and import pages (save as). Check out the Download and import file attachments option.
Optionally you can import blog posts too or all possible content. If you want to import 100% of demo content then you should follow instructions in the Demo content folder.
TIP: If you activate plugins before pages import then importer will duplicate pages, you should go to Pages -> All Pages and delete duplicated pages with the *-2 slug permanently because there will be problem with the not found error.
3. Install and activate all required (BuddyPress and OneCommunity Shortcodes) plugins by the installation wizard (you can install recommended plugins now too or do it later).
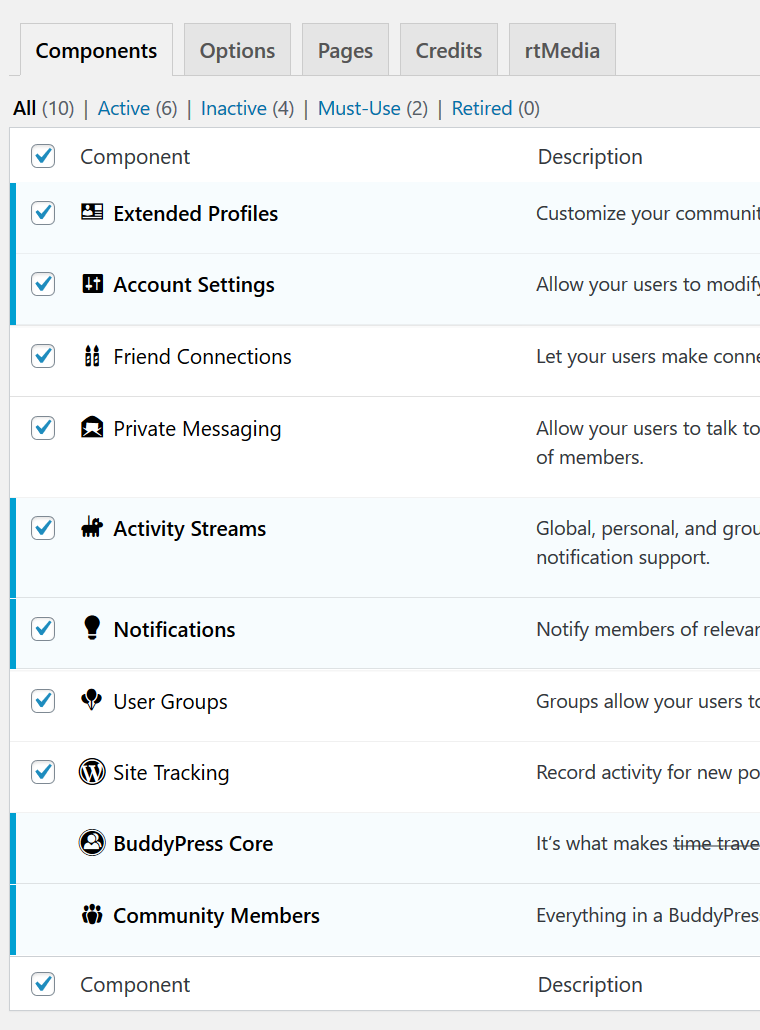
4. Go to Settings → BuddyPress → Activate all components:
5. Go to Settings → Buddypress → Options and enable/disable Allow customizable cover images for groups and Allow registered members to upload cover images.

Optionally you can go to the Pages tab and make sure all assigned pages looks like on this screenshot:

6. Go to Settings → Permalinks select Post name and SAVE
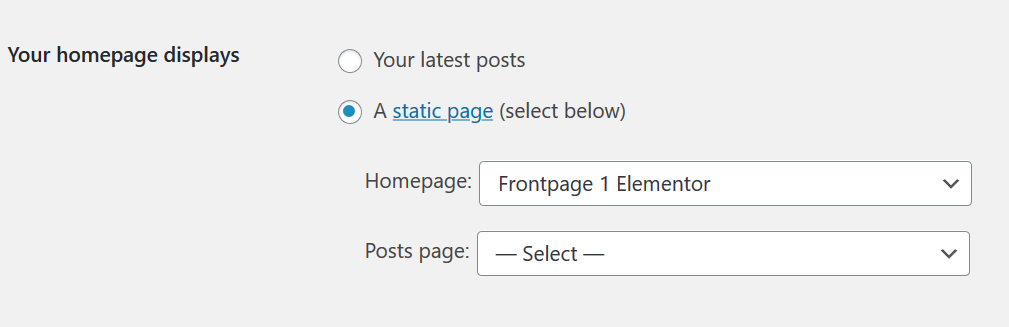
7. Go to Settings → Reading and select Homepage (not customisable by Elementor), Homepage 2 or Homepage 3 (not customisable by Elementor), Frontpage 1 Elementor, Frontpage 2 Elementor or Frontpage 3 Elementor page as your frontpage.
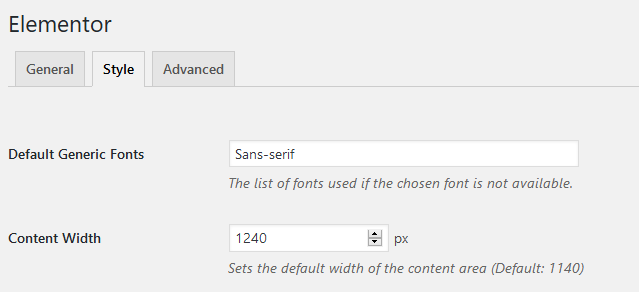
8. Go to Elementor → Settings and setup everything like on the screenshots:

9. Go to Appearance → Customize → General and switch 2/3 columns layout.
Now you should follow the II, III and IV chapter.
TIP: You can edit theme settings under Appearance → Customize.
TIP: Make sure you do not use 2 login forms on the single page including pop up window with login. You can enable the login popup window under custimizer options.
TIP: You can setup all widgets like on the screenshot. List of all shortcodes can be found under the XVII. All shortcodes list chapter.

II. How to install Ajax Search Pro plugin? - top
1. Go to Ajax Search Pro → Export/Import → paste this code under the Import Search instances section and click on the Import button.2. Go to Ajax Search Pro → Ajax Search Pro → settings of the [wd_asp id=1] search → Theme & Styling → Magnifier & loading icon.
Change the URL of the Custom magnifier icon.
Replace: https://diaboliquedesign.com/demo/onecommunity-new/wp-content/themes/onecommunity/img/search.svg
for: http://YOUR-DOMAIN-NAME.com/wp-content/themes/onecommunity/img/search.svg
[OPTIONAL] 3. Go to Ajax Search Pro → Compatibility & Other Settings → CSS & JS compatibility.
Choose CSS compatibility level: Optimal, Load the google fonts used in the search options: Off.
[OPTIONAL] 4. Go to to Ajax Search Pro → Compatibility & Other Settings → CSS and JS loading and disable Load the polaroid gallery JS?, Load the isotope JS, Load the NoUI slider JS, Load the DatePicker UI script.
Shortcode name of the search instance should be [wd_asp id=1], otherwise you should change id=1 in the header.php file in 2 places (desktops and mobiles).
III. How to install WP ULike plugin? - top
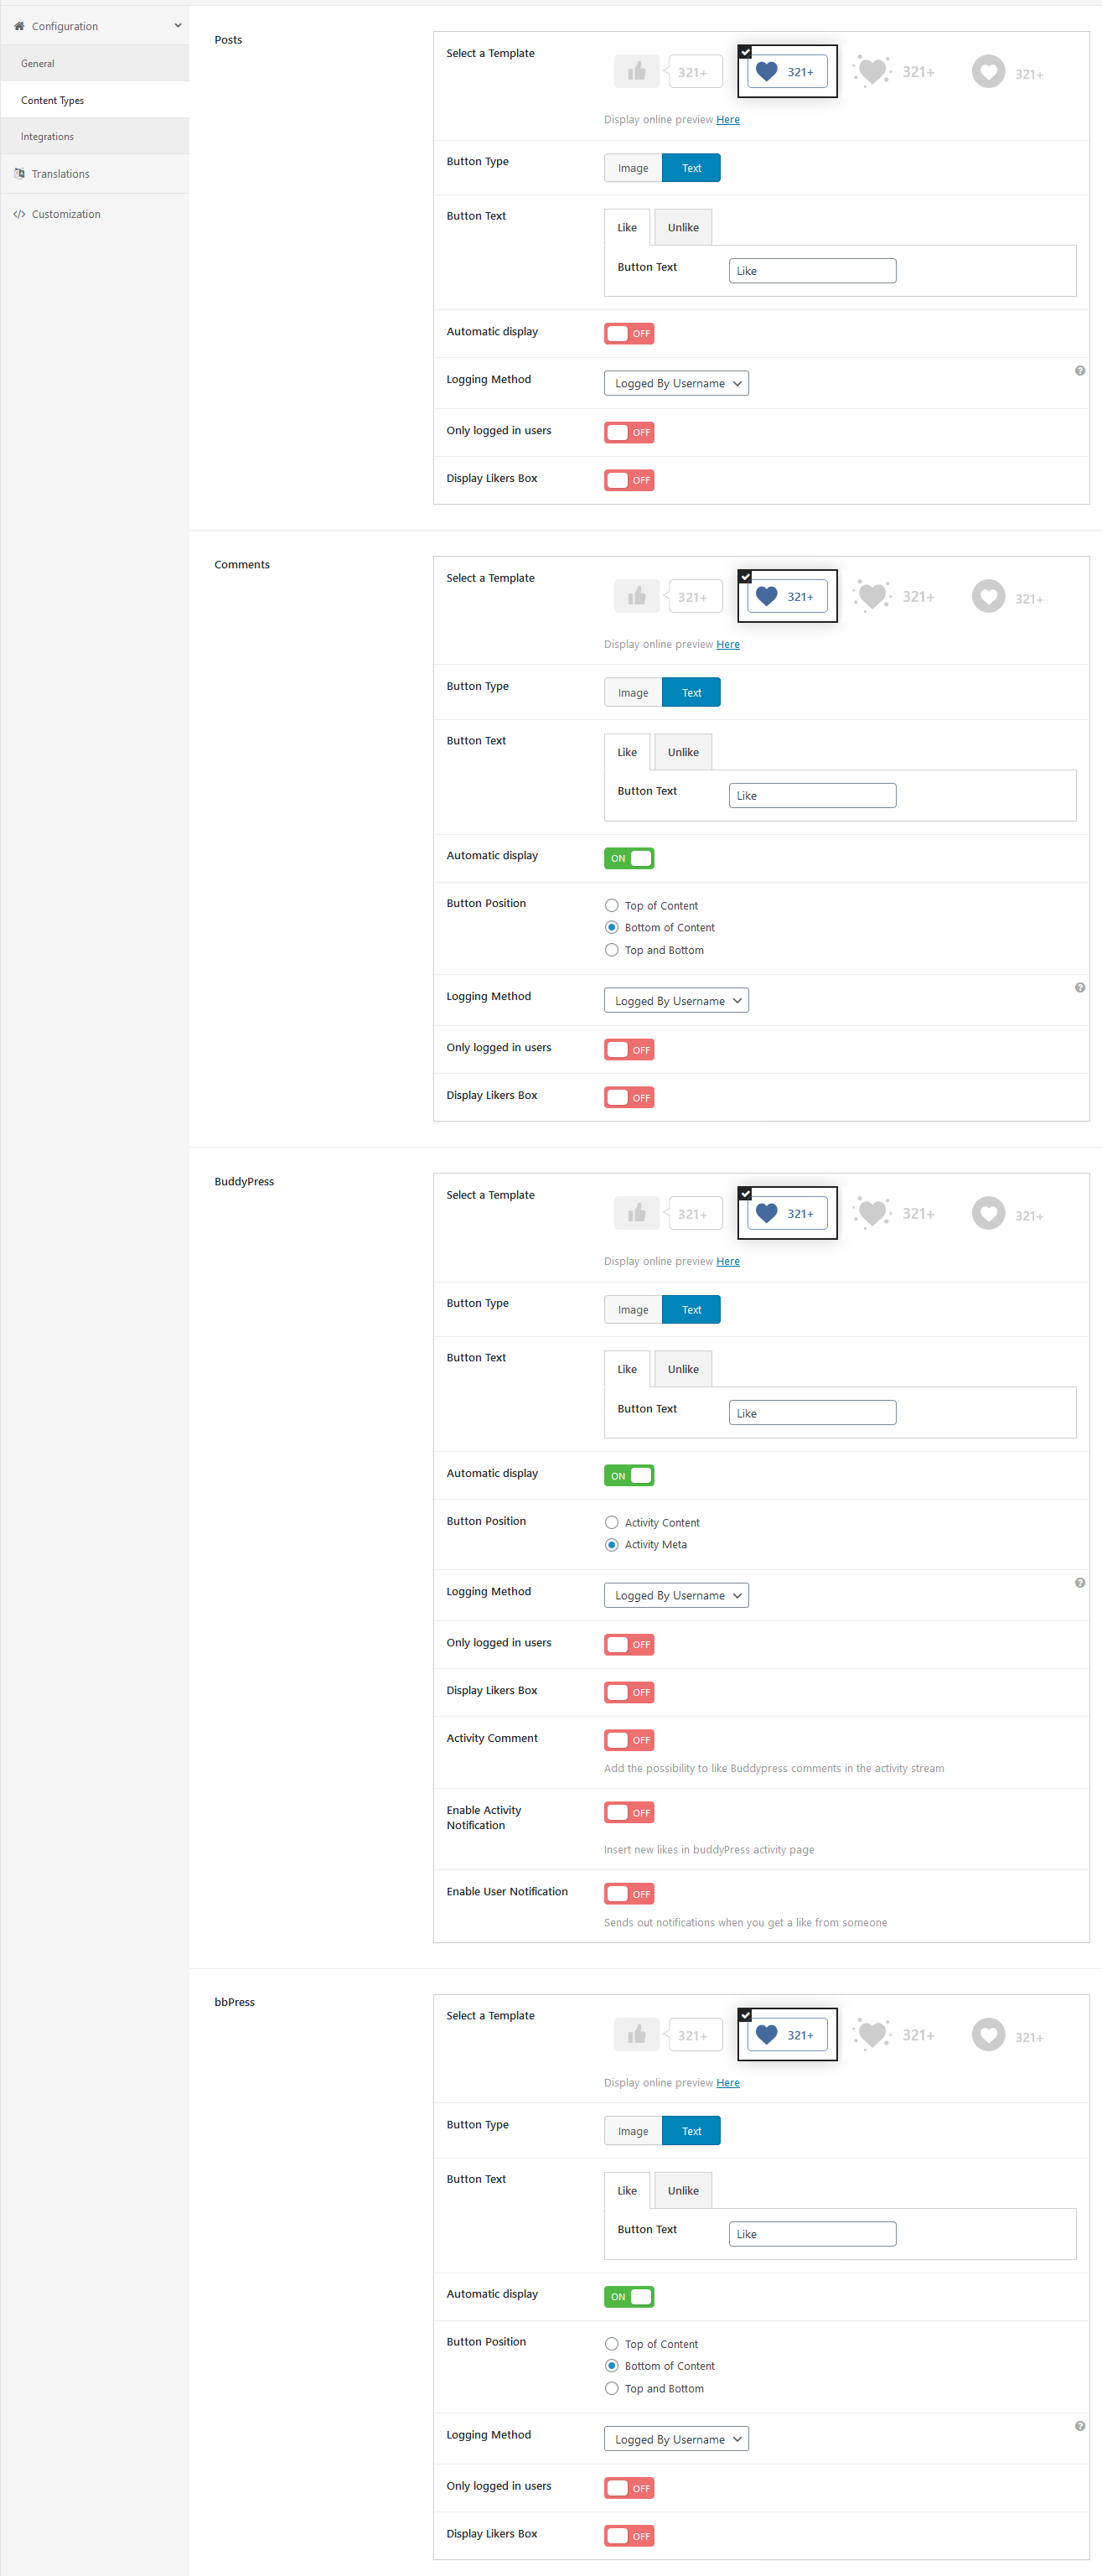
1. Activate WP ULike plugin.2. Go to WP ULike -> Settings -> Content Types and make settings like on the following screenshot:
IV. How to install GamiPress plugin? - top
1. Go to GamiPress → Tools → Import/Export and under the Setup section click on import, load this file (save as) and click on the Import Setup button.Important! If you want to use a different name for points then you should change type parameter of the onecommunity-gamipress-leaderboard shortcode.
For example if you want to use 1 name for points type then you should replace _gamipress_points_points for _gamipress_points_1. You should edit shortcodes already used in theme in the leaderboard.php, frontpage-1.php files.
V. How to install forums? - top
1. Go to Forums → Add New and create new forum called Group Forums2. Now go to Settings → Forums and select Group Forums Parent: Group Forums ans SAVE.
VI. Contact form installation - top
1. Go to Contact -> Contact Forms -> Copy shortcode with contact form. 2. Go to Pages -> All Pages -> Contact Us and paste copied shortcode. 3. Select the Contact Form template under Page Attributes.VII. How to display menu on the header? - top
Go to Appearance → Menus, create new menu called (for example) Header Menu. Select everything like on the following screenshot: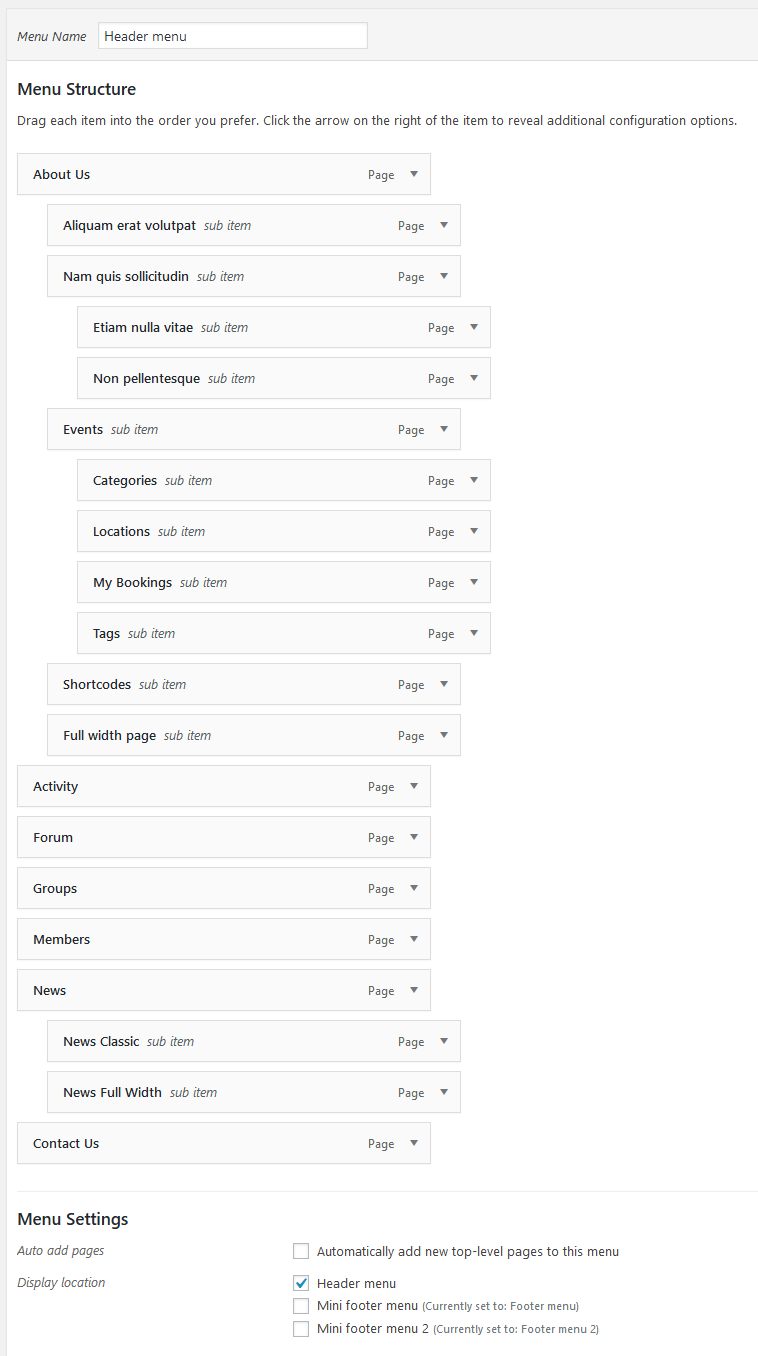
VIII. Frontpage customization using Elementor - top
IMPORTANT! Homepage, Homepage 2, Homepage 3, Homepage 4 pages are not customisable by Elementor. You should edit the Frontpage 1 Elementor, Frontpage 2 Elementor, Frontpage 3 Elementor and Frontpage 4 Elementor pages.TIP: If you don't want to customize a front page or customization isn't significant or you know HTML basics then there is no reason to use a page builder.
You can just create new page with selected Frontpage 1 or Frontpage 2 page template, setup created page as your frontpage and that's all.
Front page files (frontpage-1.php, frontpage-2.php) contain easy to understand code structure with rows and columns which you can duplicate and edit very easy. Style of frontpages is inside the style.css (9.2 - Frontpage). Style of all shortcodes is inside the wp-content\plugins\onecommunity-shortcodes\shortcodes.css file.
Elementor Documentation can be found here - https://docs.elementor.com
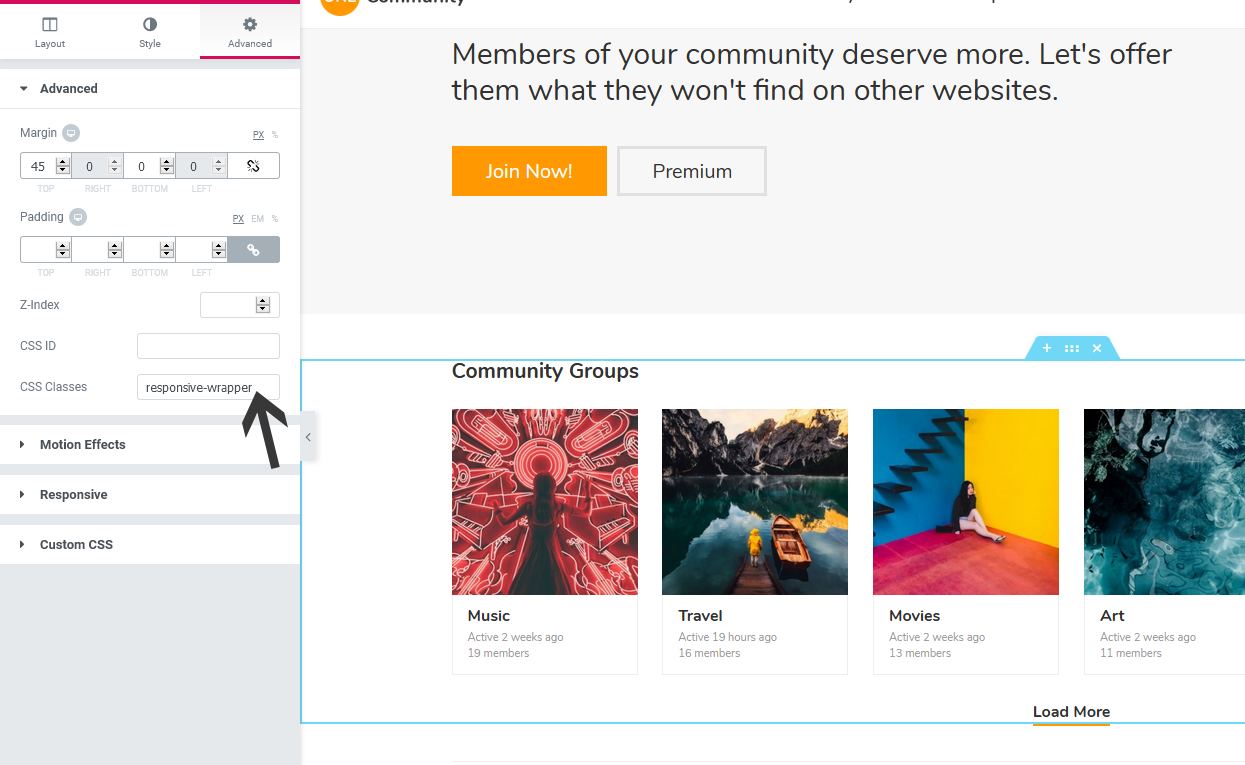
While creating new section you should put the responsive-wrapper class so your section will nicely fit the tablet and mobile screens:
If you want to invert colors of some element under the dark mode then add the invert-if-dark-mode class.
If you want to display some block for logged in users then put the for-logged-in-users class.
If you want to hide some block for logged in users then put the for-logged-out-users.
IX. How to translate theme? - top
1. Go to Settings → General and choose Site Language.2. Install and activate the Loco Translate plugin.
3. Go to Loco Translate → Themes → OneCommunity → New Language → Choose a language → Choose a location -> Start translating
4. Go to Loco Translate → Plugins → OneCommunity Shortcodes and translate this plugin too.
After successful translation you can disable the Loco Translate plugin.
X. How to add subtitle and thumbnail caption to a blog post? - top
While creating post click on the Add block -> Paragraph and add the new class subtitle under Advanced tab.
If you want do add short text below thumbnail then while adding thumbnail put some text into Caption field.
XI. Profile Fields - top
You can create new custom fields under WP Dashboard -> Users -> Profile Fields.If you want to display a custom fields on the right sidebar of user profile page please open the wp-content/plugins/onecommunity-shortcodes/inc/profile-fields.php file and paste following code at the bottom just before </div><!-- bp-profile-fields -->:
<!-- SINGLE PROFILE FIELD -->

	<?php
	$profile_field = bp_get_member_profile_data( 'field=Location' );
	if( $profile_field ) { ?>
	<div class="item bg">
	<div class="left"><?php _e( 'Location', 'onecommunity-shortcodes' ); ?>:</div>
   	<div class="right"><?php echo $profile_field ?></div>
	</div>
	<?php } ?>

<!-- SINGLE PROFILE FIELD -->
Now you should change the Location field name.
XII. How to install events? - top
1. Install the Events Manager plugin.2. Go to WP Dashboard -> Events -> Settings -> Pages -> Event Pages and make sure there is selected Display events as Posts.
3. Go to WP Dashboard -> Events -> Formatting -> Maps and septup empty Default map width and Default map height.
You can use following shortcode in page builder, if you want to display recent events:
<div class="shortcode-events">
<h1 class="shortcode-events-title">Upcoming Events</h1>
[events_list_grouped mode="monthly"]
<div class="shortcode-events-row">
<div class="shortcode-events-left">#_EVENTDATES<br> #_EVENTTIMES</div>
<div class="shortcode-events-right">
<div class="shortcode-event-title">
#_EVENTLINK in #_LOCATIONTOWN</div>
<div class="shortcode-event-location">#_LOCATIONNAME</div></div>
</div>
[/events_list_grouped]
</div>
If you want to show the featured event then use and customise following code:
<div class="dd_single-event">

<a class="dd_single-event-image" href="">
	<img src="<?php echo esc_url( home_url( '/' ) ); ?>/event.jpg">
	<span>
	Free
	<small>Entrance</small>
	</span>
</a>

<div class="dd_single-event-cat">Night Party</div> <div class="dd_single-event-time">4:00 pm - 10:45 pm, Feb 14</div>
<h4><a href="">Evenings & weekends in the city in New York</a></h4>
<div class="shortcode-event-location">Plaza de Toros de La Misericordia,  Silver Street, Spain</div>

</div>
XIII. How to configure a Paid Membership Pro plugin? - top
First of all please read the plugin's documentation - https://www.paidmembershipspro.com/documentation/1. Install and activate Paid Memberships Pro and Paid Memberships Pro - BuddyPress Add On plugins.
2. Go to Memberships -> Settings -> Add New Level.
3. You can go to Memberships -> PMPro BuddyPress and configure access settings.
If you need more advanced solutions then you can use a pmpro_hasMembershipLevel() function. Examples:
<?php
if(pmpro_hasMembershipLevel('1'))
{
?>
//Place your HTML or PHP code here if the user is in the required membership level
...
<?php
}
?>
<?php
if(pmpro_hasMembershipLevel('Gold'))
{
?>
//Place your HTML or PHP code here if the user is in the required membership level
...
<?php
}
?>
<?php
if(pmpro_hasMembershipLevel('1','2','Gold'))
{
?>
//Place your HTML or PHP code here if the user is in the required membership level
...
<?php
}
?>
For example if you want to show messages tab for 1, 2, 3 level members then paste follwoing code in the header.php of theme:
<style type="text/css">
#messages-personal-li { display:none; }
</style>
<?php
if(pmpro_hasMembershipLevel('1','2','3'))
{
?>
<style type="text/css">
#messages-personal-li { display:inline-block; }
</style>
<?php
}
?>
XIV. How to install WooCommerce plugin? - top
1. Install and activate the WooCommerce plugin.2. Go to Appearance -> Customise -> WooCommerce -> Product Images and setup following settings:
Main image width: 900
Thumbnail width: 500
Thumbnail cropping (custom): 50:37
XV. How to customize theme? - top
Styling of this theme is inside the style.css file, style of forums is inside css/bbpress.css, style of buddypress is in the wp-content/themes/onecommunity/buddypress/css/buddypress.css file.Own style you can keep under Appearance -> Customize.
Style of all shortcodes is grouped in the wp-content/plugins/onecommunity-shortcodes/shortcodes.css file.
Shapes visible on the frontpage header you can edit in frontpage-1.php, frontpage-2.php, frontpage-page-builder.php
<div class="shape-1"></div>
<div class="shape-2"></div>
<div class="shape-3"></div>
<div class="shape-4"></div>
<div class="shape-5"></div>
<div class="shape-6"></div>
Images:
themes/onecommunity/img/shape-1.png
themes/onecommunity/img/shape-2.png
themes/onecommunity/img/shape-3.png
themes/onecommunity/img/shape-4.png
themes/onecommunity/img/shape-5.png
themes/onecommunity/img/shape-6.png
Style is in the style.css:
.shape-1 { ... }
.shape-2 { ... }
.frontpage-style-2 .shape-2 { ... }
.shape-3 { ... }
.shape-4 { ... }
.shape-5 { ... }
.shape-6 { ... }
Animations are in the themes/onecommunity/css/animations.css:
/*------------------- Frontpage shapes animations ----------------------*/

@keyframes animateShape-1 {
0% { right:3%; top:3%; }
50% { right:2%; top:5%; }
100% { right:3%; top:3%; }
}

@keyframes animateShape-2 {
0% { transform: rotate(0deg); }
50% { transform: rotate(60deg); }
100% { transform: rotate(0deg); }
}

@keyframes animateShape-3 {
0% { right:-2%; bottom:6%; }
50% { right:-3%; bottom:4%; }
100% { right:-2%; bottom:6%; }
}

@keyframes animateShape-4 {
0% { left:-2%; bottom:6%; }
50% { left:2%; bottom:6%; }
100% { left:-2%; bottom:6%; }
}

@keyframes animateShape-5 {
0% { transform: rotate(0deg); }
50% { transform: rotate(-180deg); }
100% { transform: rotate(0deg); }
}

@keyframes animateShape-6 {
0% { transform: rotate(0deg); }
50% { transform: rotate(-180deg); }
100% { transform: rotate(0deg); }
}
Icons and colors on the frontpage 2 header you can change in style.css
.front-info-box h1 { width: 70%; font-weight: 700; font-size: 48px; color: #ffffff; ... }
.front-info-box h1 a { color: #ffffff; }
.front-info-box-1 { background-image: url( "img/box-icon-profile.png" ); background-color: #12eac4; }
.front-info-box-2 { background-image: url( "img/box-icon-members.png" ); background-color: #46ccfc; }
.front-info-box-3 { background-image: url( "img/box-icon-groups.png" ); background-color: #1afbfe; }
.front-info-box-4 { background-image: url( "img/box-icon-messages.png" ); background-color: #f4aa4a; }
Background color of the 1st frontpage row (with login) can be changed if you use following css snippet (you can put it under Appearance -> Customize -> Additional CSS):
.frontpage-row-1 { background-color: #000000; }Additionally here is a trick how to easy find styling of each theme element using web browser. For examply you want to find where is defined the width of members colums:
You should make right click on the inspected element and choose Inspect:
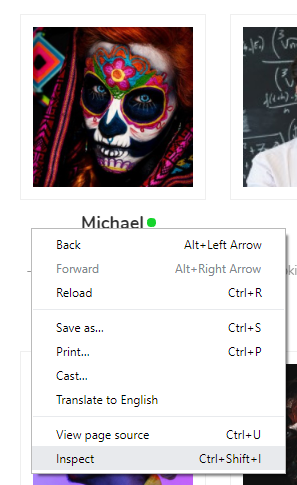
You will see a Developer Tools window. You should hover over tree until you will see whole column in color just like on the screenshot:

On the right window is displayed the style of this element and file where this code is placed (buddypress.min.css in this case):
.buddypress-wrap #members-list li.item-entry {
    width: 15%;
    margin-right: 2%;
    margin-bottom: 2.8%;
    float: left;
}
As you can see there is width: 15%; parameter. Now you can copy this style into your child theme or Additional CSS field under the Customizer and customize it.XVI. All shortcodes list - top
Here is the list of all shortcodes:IMPORTANT!: Some shortcodes can be cached with transients, so if you want to see instant changes you should remove treansients with onecommunity_ prefix using the Transients Manager plugin.
[onecommunity-login]
You can use only one login form including pop up login.
You can disable pop up window on specific page in footer.php.
This shortcode is already in the footer.php

[onecommunity-recent-forum-topics number_of_topics="3" col="1"]

[onecommunity-recent-blog-posts-tag number_of_blog_posts="3" tag="" col="1"]

[onecommunity-recent-blog-comments number_of_comments="4" col="1"]

[onecommunity-recent-blog-posts number_of_blog_posts="3"]

[onecommunity-blog-posts per_page="3" col="3" title="Recent News"]

[onecommunity-bp-groups-listing title='Community Groups' number_of_groups='6' col='6' type='']

[onecommunity-bp-groups-listing-2 number_of_groups="6" sort_type="active" type=""]

[onecommunity-blog-categories taxonomy="category" limit="10"] Categories list with icons

[onecommunity-swiper-one tag="" limit="5"] Swiper slider 1

[onecommunity-swiper-two tag="Featured" limit="7"] Swiper slider 2

[onecommunity-swiper-three tag="" limit="7"] Swiper slider 3

[onecommunity-blog-tags]

[onecommunity-popular-blog-posts number_of_posts="5"]

[onecommunity-sidenav] Already inserted in footer.php

[onecommunity-gamipress-leaderboard limit="10" name="points" layout="small" type="_gamipress_points_points"]
[onecommunity-gamipress-leaderboard limit="20" name="points" layout="big" type="_gamipress_points_points"]
[onecommunity-gamipress-leaderboard-small limit="10" name="points" type="_gamipress_points_points"] CACHED
[onecommunity-gamipress-leaderboard-big limit="20" name="points" type="_gamipress_points_points"] CACHED

[onecommunity-activity max="8" col="2"]

[onecommunity-cat-posts cat_id="15,85,17,21,19,20,86,6,7,5,13"]

[onecommunity-learnpress-featured limit="3" col="3" excerpt="yes" duration="yes" load_more="yes"]

[onecommunity-featured-products]

[onecommunity-blog-categories]

[highlight]Praesent bibendum, libero faucibus vehicula vulputate.[/highlight]

[go href="http://code.google.com"]Take a look on it![/go]

[leftpullquote]Sed sagittis, justo quis sollicitudin viverra...[/leftpullquote]
[rightpullquote]Sed sagittis, justo quis sollicitudin viverra...[/rightpullquote]

[quote]Donec fringilla, urna sit amet euismod congue[/quote]
[quoteby by="Nicole said:"]Donec fringilla, urna sit amet euismod congue.[/quoteby]

[notice]Aenean molestie pharetra facilisis. Duis sem quam, hendrerit nec commodo quis, cursus eget elit.[/notice]

[h1]Heading 1[/h1]
[h2]Heading 2[/h2]
[h3]Heading 3[/h3]
[h4]Heading 4[/h4]
[h5]Heading 5[/h5]
[h6]Heading 6[/h6]


[member]You are a member so you can see this message.[/member]


[h6]2 columns[/h6]
[one_half]
	Vivamus ut lectus vitae sapien bibendum mollis. Nam ac risus in urna accumsan ornare nec a sapien.
[/one_half]
[one_half_last]
	Vivamus ut lectus vitae sapien bibendum mollis. Nam ac risus in urna accumsan ornare nec a sapien.
[/one_half_last]


[h6]3 columns[/h6]
[one_third]
	Vivamus ut lectus vitae sapien bibendum mollis. Nam ac risus in urna accumsan ornare nec a sapien.
[/one_third]
[one_third]
	Vivamus ut lectus vitae sapien bibendum mollis. Nam ac risus in urna accumsan ornare nec a sapien.
[/one_third]
[one_third_last]
	Vivamus ut lectus vitae sapien bibendum mollis. Nam ac risus in urna accumsan ornare nec a sapien.
[/one_third_last]


[h6]4 columns[/h6]
[one_fourth]
	Vivamus ut lectus vitae sapien bibendum mollis. Nam ac risus in urna accumsan ornare nec a sapien.
[/one_fourth]
[one_fourth]
	Vivamus ut lectus vitae sapien bibendum mollis. Nam ac risus in urna accumsan ornare nec a sapien.
[/one_fourth]
[one_fourth]
	Vivamus ut lectus vitae sapien bibendum mollis. Nam ac risus in urna accumsan ornare nec a sapien.
[/one_fourth]
[one_fourth_last]
	Vivamus ut lectus vitae sapien bibendum mollis. Nam ac risus in urna accumsan ornare nec a sapien.
[/one_fourth_last]


[h6]5 columns[/h6]
[one_fifth]
	Vivamus ut lectus vitae sapien bibendum mollis. Nam ac risus in urna accumsan ornare nec a sapien.
[/one_fifth]
[one_fifth]
	Vivamus ut lectus vitae sapien bibendum mollis. Nam ac risus in urna accumsan ornare nec a sapien.
[/one_fifth]
[one_fifth]
	Vivamus ut lectus vitae sapien bibendum mollis. Nam ac risus in urna accumsan ornare nec a sapien.
[/one_fifth]
[one_fifth]
	Vivamus ut lectus vitae sapien bibendum mollis. Nam ac risus in urna accumsan ornare nec a sapien.
[/one_fifth]
[one_fifth_last]
	Vivamus ut lectus vitae sapien bibendum mollis. Nam ac risus in urna accumsan ornare nec a sapien.
[/one_fifth_last]


[h6]6 columns[/h6]
[one_sixth]
	Vivamus ut lectus vitae sapien bibendum mollis. Nam ac risus in urna accumsan ornare nec a sapien.
[/one_sixth]
[one_sixth]
	Vivamus ut lectus vitae sapien bibendum mollis. Nam ac risus in urna accumsan ornare nec a sapien.
[/one_sixth]
[one_sixth]
	Vivamus ut lectus vitae sapien bibendum mollis. Nam ac risus in urna accumsan ornare nec a sapien.
[/one_sixth]
[one_sixth]
	Vivamus ut lectus vitae sapien bibendum mollis. Nam ac risus in urna accumsan ornare nec a sapien.
[/one_sixth]
[one_sixth]
	Vivamus ut lectus vitae sapien bibendum mollis. Nam ac risus in urna accumsan ornare nec a sapien.
[/one_sixth]
[one_sixth_last]
	Vivamus ut lectus vitae sapien bibendum mollis. Nam ac risus in urna accumsan ornare nec a sapien.
[/one_sixth_last]
XVII. Youzify - top
If you want to use theme with the Youzify plugin then you should install the special version of theme which is inside the Youzify folder.XVIII. How to install LearnPress? - top
Go to Plugins -> Add New -> Find the LearnPress plugin, install it and lunch the installation wizard.Actually theme is working with LearnPress 3.x which you can download here.
XIX. How to increase speed of your website? - top
1. Install the LiteSpeed Cache plugin. Go to WP Dashboard -> LiteSpeed Cache -> Import / Export and import settings from this fileIMPORTANT! If your hosting isn't on LiteSpeed server then additionally you should install some simpe caching plugin, for example WP Super Cache or deinstall LiteSpeed Cache plugin and install for example W3 Total Cache and enable lazy loading for images, combine css/js files, setup long expiration headers.
You can use any other cache plugin but when you combine javascript files in one file then exclude following files:
		accounting.min.js
		jquery-ui-touch-punch.min.js
		price-slider.min.js
		slider.min.js
		quicktags.min.js
		tinymce.min.js
		jquery.js
		jquery.min.js
		swiper-bundle.min.js
2. Enable Transients under Appearance -> Customize -> Transients (fragment cache). Go to LiteSpeed Cache -> Settings -> Advanced tab and make Object Cache On, choose method Memcached or Redis and configure it. Almost all hostings offers Memcached module (you should activate it under hosting settings), Redis usually is on dedicated for WordPress hostings. After successful configuration all transients will be loaded from fast RAM.
Transients can be managed/deleted using the Transients Manager plugin.
3. Use at least 7.1 version of PHP. It's always recommended to use the latest version but not all plugins can be compatible yet.
4. Enable OPCache on your server, it's very important. You can enable it under hosting panel.
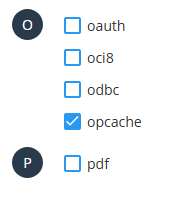
This is how to check out does the OPCache is enabled on your server. Create a new file called phpinfo.php in ROOT of your WP installation with following code:
<?php phpinfo(); ?>Now open the http://www.yourdomainname.com/phpinfo.php in web browser. There should be following value displayed:
opcache.enable On5. Setup 512M per process memory_limit, usually it can be adjusted in .htaccess file adding following code at the bottom:
php_value memory_limit 512MBe careful because on some servers it can cause 500 internal server error.
Theme with all plugins used on the live demo shouldn't consume more than 450 MB of RAM.
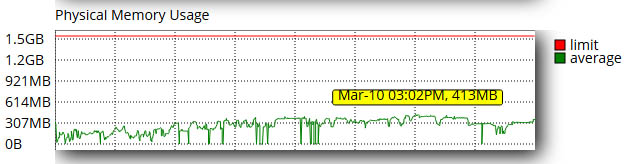
If you installed some other plugins then it's possible your website will need more RAM limit per process, but don't setup it too high because one process will consume too much server resources. Also make sure your hosting account offers at least 1 GB of RAM.
6. Make sure there is no broken links to images on the website. It can slow down the website significantly.
7. Disable all unused plugins (for example WooCommerce, Learnpress). More plugins active - more server resources will be used.
XX. How to assign selected blog posts to the BuddyPress group? - top
1. Go to Customize → General and select:Enable the blog posts tab inside the buddypress groups and create new taxonomy (you can create the new blog groups under Posts → BP Group Post, slug should be the same like the ID of BP group you want assign the posts).
2. Go to Posts → BP Groups Posts → Add New BP Group Post. While creating new group posts type choose the same slug as BuddyPress group ID number. You can find group ID number under WP Dashboard → Groups. Enter any group then you should see gid= parameter in URL, this is a group ID.
Once again, thank you so much for purchasing this theme. If you have a more general question relating to the themes on ThemeForest, you might consider visiting the forums and asking your question in the "Item Discussion" section.
Diabolique Design